| Be Successful Germinating Rice Seeds |

|
Generally, rice seeds are easy to germinate. We have seen rice seeds still on the panicle in the field germinate in high humidity! However, there can be seeds that will prove difficult, and we hope to provide information that will help you be successful germinating rice seeds. Click here to download a pdf of this page.
 |
|
|
DIRECT SEEDING INTO POTS IN GREENHOUSE If you have plenty of seeds and have no reason to expect a problem with germination, you can go directly into the soil. Supplies needed for each rice accession include a 1-gallon pot with drainage holes, filled to within 2 inches with potting soil, a larger tub or pot slightly taller than the 1-gallon pot and a small amount of lawn and garden fertilizer. Moisten the soil and allow water to drain out of the bottom of the pot. Place 4-5 seeds around the soil surface, no more than ½ inch beneath the soil. Provide additional moisture each day. Be careful not to drown the seeds. You should see the first leaf within 7-10 days. Once the seedlings produce 5 leaves, maintain constant moisture by keeping water in the larger tub. Add a small amount of fertilizer to water. As the seedlings grow, gradually increase the ‘flood’ to about half way up the pot. Monitor daily and add water as needed. Water usage will drastically increase when panicles begin to form, 70-90 days after planting. You should be able to harvest mature rice seeds 30-40 days after the panicles have formed. Store rice seeds in a sealed container in a refrigerator, or cool, dry space. |
|
|
BLEACH PRE-TREATMENT If you have a concern of fungal contamination of the seeds, use a 10% sodium hypochlorite solution for 30 minutes. After 30 minutes, rinse seeds using autoclaved water. Allow seeds to dry overnight in a sterile fume hood, before direct seeding or placing in labeled petri dishes for the germination. |
|
|
GERMINATE SEEDS TO TRANSPLANT If you need a minimum number of seedlings, you can pre-germinate the seeds and then transplant the seedlings. Healthy seeds should germinate with just a bit of water, warmth and light in 3-5 days. Our germination test protocol is to place seeds onto filter paper in a petri dish, moisten, cover and place in a growth chamber set at 30⁰C with 12 hours of light for 72 hours. Add water each day. This is a good test to determine if the germination is questionable or if your seed stock is limited.
|
|
|
Transplant seedlings into pots as described above in the Direct Seeding section. Add a newspaper tent to shield the seedlings the first day or two, to allow them to acclimate to the greenhouse environment.
|
|
|
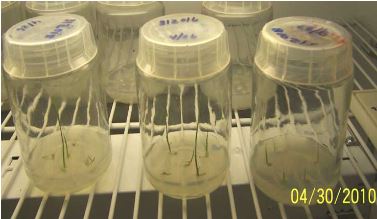
GERMPLASM RESCUE PROCEDURES
Use the germplasm rescue protocol when seeds are very limited, are known to be difficult to grow, as in wild rice species, and/or the viability is low or unknown. This protocol involves more preparation and additional supplies to produce seedlings which can then be transplanted. The protocol is described in detail on the GSOR website, on the Germination Procedures page. Also available is a printable supply list. Procedures include surface sterilizing dehulled seeds with a 70% bleach solution and placing the seeds into Magenta boxes with nutrient-rich medium. Transplant seedlings as mentioned above, including the newspaper shield to allow seedlings to acclimate.
|